Thursday, April 30, 2015
Bear Pawlish: Bringing it back and new topcoat!
Bear Pawlish is bringing back some much requested shades and I had the chance to swatch and share them all with you! In addition to these, she is also launching her quick dry top coat, Oso Quick! She'll be sending a bottle of that to me to try soon as well!
Jabberwocky is a multichrome shifter and she's a little camera shy sometimes, so I took a fourth image which captured all the colors in one image - blue, purple, and a coppery reddish shade. I wore three coats with topcoat for the images. The formula was good - it seemed to dry a little quickly for me so Tennessee is going to do a little tweaking so that the launch bottles will be perfect!
Luscious is also a multichrome shifter with blue, grapey purple and violet purple! I fell hard and fast for this one! The formula on this one is similar to Jabberwocky, but I only needed two coats for opacity and may have gotten away with just one. It's quite pigmented!
Luscious...in holo! Yep this is the same polish as above, but with holographic pigment added and is a new addition to Bear Pawlish's line up. The holo pigment lightens the shade of the polish a hare, beautiful isn't it?
May Flowers is a frosted salmon pearlescent shade that sometimes looks pink and sometimes peach. The close up images do show brushstrokes, but in person this looks like satin on the nail! I wore three coats with topcoat for the photos. The formula on this one was a little challenging in that it wanted to pull up when I ran the brush over the same spot twice. Once I got the first coat on the nail it was more forgiving and easier to apply. I think that perhaps my base coat (yellow stopper) just didn't get along well with it - which happens sometimes. :)
And I've saved my favorite for last, this is Poor Unfortunate Soul, a rich dark teal leaning green with a holographic effect. When I look at this polish it's like looking into something infinitely deep. I am totally wowed by this one and quite smitten by it! The formula is perfect, it practically applied itself. The only clean up I did, was to straighten out the curve near the cuticle just a tad on a couple of nails.
All five of these polishes plus the new topcoat will launch May 1 at 11am Central time in the Bear Pawlish shop!
Please comment and let me know if you've enjoyed the review and photos!
Tuesday, April 28, 2015
b.i.t.c.h. by jaclyn: Garden Hoe with stamping nail art
I'm doing this a little bit backward, posting nail art before the collection review; but I just had to share this right away! I'm quite pleased with how it turned out and let's just call this a sneak peek of me wearing Garden Hoe, shall we?
I used hehe stamping plate 4 and MDU stamping polish 24 for the butterfly, SH Extreme Wear White On for the vines, stamped with a brand new stamper from Chelle Lee which is available to order online, and then I placed a few glitters from the May Flowers glitter topper to finish the look.
What do you think? I think I'm in love!
Sunday, April 26, 2015
Black Dahlia: Holo Petals collection
The Holo Petals collection from Black Dahlia consists of six polishes; three scattered holos and three linear holos. These launched earlier in April for spring and are available now!
Every single one of these polish's formula is phenomenal. A smooth easy to apply formula goes a long way with me, especially when they're nearly opaque in one coat! If I were a bit more heavy handed, I could have gotten away with one, but I wore two coats for all the photos. The glitters and glass flecks in these really add dimension and make them unique. I hope you enjoy the photos!
Magical Moss: Silvered celery green linear holo with silver and aqua micro glitter and blue glass flecks
Gold Rush: Gold linear holo packed with holographic gold micro glitter and gold shimmer
Turquoise Hibiscus: Turquoise scattered holo with glass flecks that shift from violet to blue to green, and blue and green micro to small hex glitter
Mountain Laurel: Orchid pink linear holo with blue and purple glass flecks, and loaded with violet and aqua shimmer
Moonlight Daisy: Royal blue scattered holo with blue, turquoise and silver micro glitter, red glass flecks and sapphire shimmer
Lilacs in Lava: Lavender scattered holo with neon purple flakies and glass flecks that shift from red to orange to gold
All of these pretty polishes and more are available on http://www.blackdahlialacquer.com/.
My favorites of the collection would have to be Lilacs in Lava and Moonlight Daisy. Which ones are your favorites?
Wednesday, April 22, 2015
Friday, April 10, 2015
Cupcake Polish: Purple Rain
Purple Rain was my very first Cupcake polish from 2013, I think I ordered it fairly close to my birthday as a treat for myself. I had not heard of the brand but saw a swatch of Amy's from AtlCat'sMeow on facebook and fell hard for it. So I had to have it!
It's a beautiful violet purple with holographic goodness. I took this photo set about a week after it arrived. I realized that I had never blogged about it until a fan asked for photos of some of the original polishes from Cupcake. I don't know if this is one of them, but it is certainly from when I first heard about the brand.
I remember the polish was fairly sheer and so I used more than two coats, but I don't recall the exact number. Anywho, I hope you all enjoy seeing a little blast from the past here!
These photos were taken when I still struggled with capturing the holographic rainbow on the nail unless it was super strong. So while these photos look fairly holo - they are so much stronger. :)
Thanks for walking with me down memory lane! :)
Wednesday, April 8, 2015
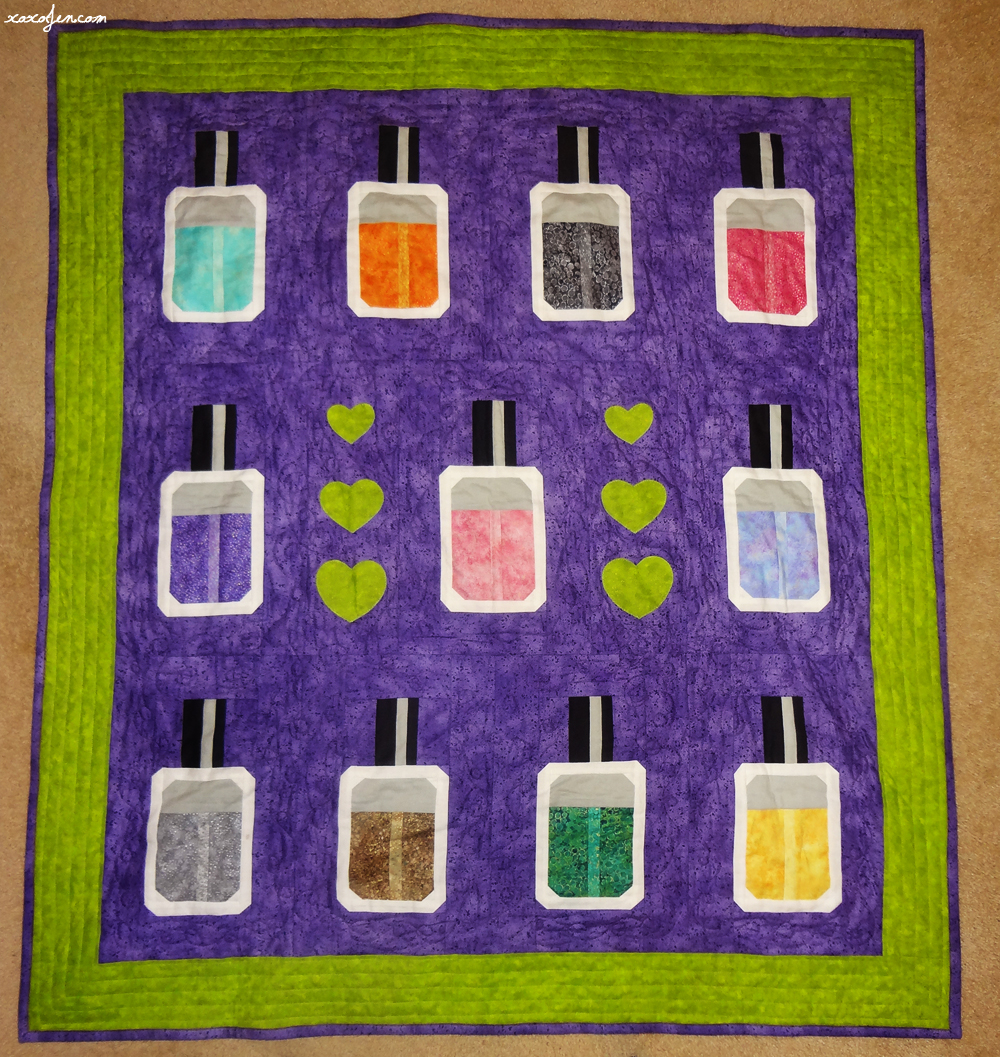
My Nail Polish Quilt and Organizers
My mom surprised me with this quilt back in November last year at the annual craft fair that she and I run a booth at. She's the crafy one, I just help carry the things she has made, display and sell them.
We were unpacking the quilts to hang on the quilt rack. This rack has three rungs and is about 8 feet wide. So I hang on the bottom rung first, then middle then top so they all lay correctly. As I start hanging, she pulls more quilts out and hands me one with purple backing. I set it down because it was purple and I wanted it on the top rung since purple is my favorite color. So I finally get to the top rung of the rack and reach for this quilt which is still neatly folded on the table. I unfold it so I can refold it for display and I'm looking at the back of it - I didn't realize it was mine until I finished folding and flipped it around to hang it. I squealed loudly with glee, then I hugged it tight and said, "THIS ONE IS MINE!!!!" And then, still clinging onto the quilt, I hugged her even tighter. I held it out to admire it some more and then realized that I had just put my mom through such suspense waiting for my reaction so we had a good laugh about that.
The technique she used, I think, is called free-motion and is in a loopy pattern. She did it all on her Pfaff sewing machine. And shame on me for this, but I can't remember whether she made the pattern for the blocks herself, but I bet my savings that she did. She's crafty like that! She also did not prewash the fabric so that I could have that beautiful crinkled effect that I love so much about quilts.
My mom also made this little beauty! It is my nail tool and 'stuff' organizer. Can you believe all this stuff fits in a standard sized coffee mug?
The holder just wraps around the mug and velcros under the handle. There are heaps of pockets on the inside and outside to hold all the things! It's so handy to have everything in my reach without taking up a lot of desk space or having to open a drawer with wet nails.
And finally, something that I made! I went to quilt retreat with mom in July last year. It was my first time going and I had a great time, made some new friends and learned a LOT of stuff. I made two of these and really enjoyed doing it! It's the perfect size for cotton balls or felt and foil(that's what's in the other one!).
I use each one of these things daily and don't know how I went without them. Thank you mom, so much for teaching me and being so good to me! :)
Tuesday, April 7, 2015
Black Dahlia with stamping nail art
I recently received some new stamping plates and wanted to try them out. I found some time to stamp over a polish I recently reviewed and one that's going to be in a future review of mine.
I am still working at technique so the stamps sometimes don't transfer perfectly from the plate to the stamper. I think that I am improving though, I'm quite pleased with how these transferred!
All supplies were purchased by me except for the Black Dahlia polishes, those were sent to me for review.
Base is Black Dahlia Teal Hydrangea stamped with plate VL030 and MDU #4 stamping polish.
Base is Black Dahlia Magical Moss stamped with plate AP18 and Konad black stamping polish.
See what I did there? Matchy matchy with the logo! When I saw that plate I knew I had to have it for this very purpose. :)
So, what do you think?
Subscribe to:
Posts (Atom)